Understanding Exposure and the Zone System
A plain-language guide to how cameras capture light - from the basics of exposure to the Zone System and how to use it in the field
What Is Exposure?
Exposure is the amount of light you let into your camera. That is it. Everything else in photography - every dial, every number, every technical term - is just a way of controlling that one thing.
Think of it like filling a glass of water from a tap. The glass is your photograph. You want to fill it to the right level - not too much (overexposed, too bright), not too little (underexposed, too dark). Just right.
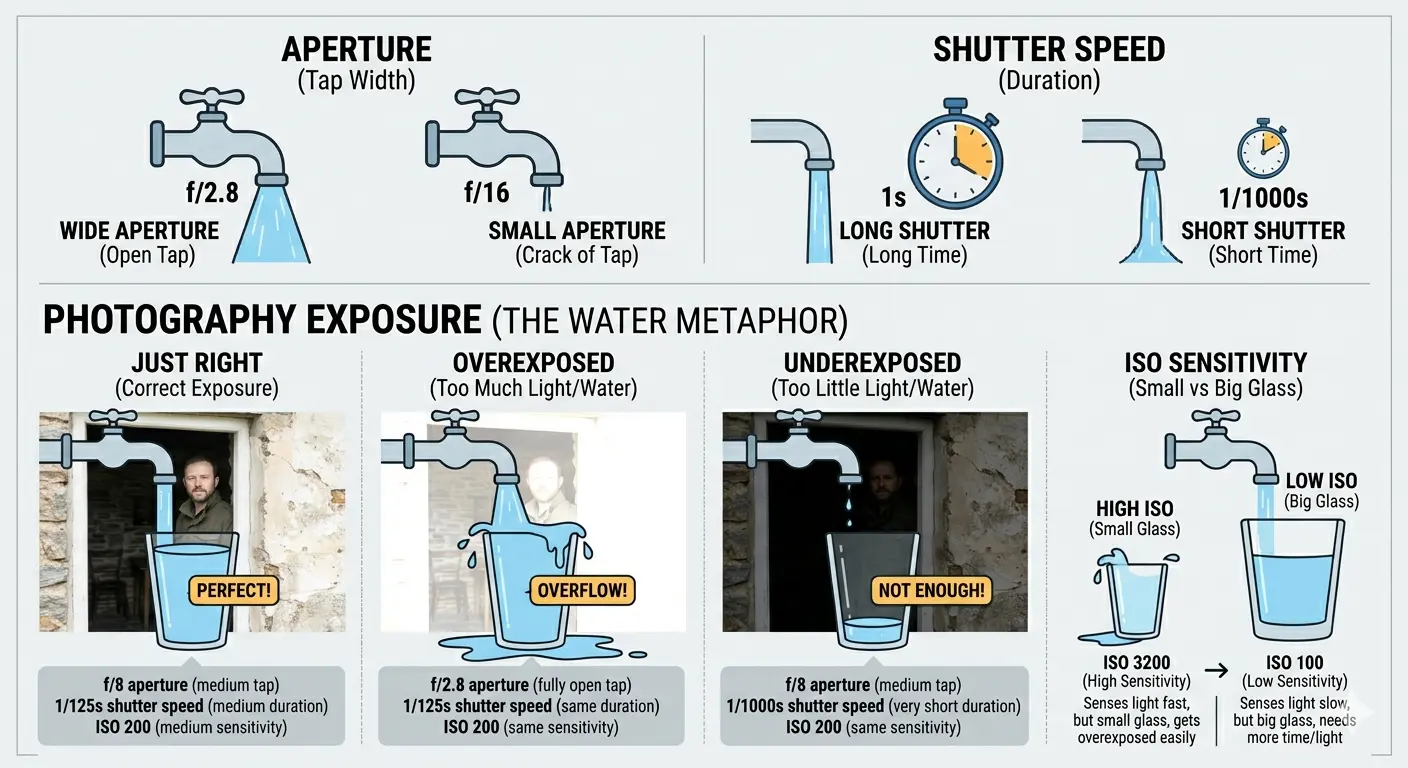
You have two ways to control how much water goes into the glass:
- How wide you open the tap. Open it fully and water floods in. Open it a crack and it trickles. In photography, this is the aperture - how wide the lens opens.
- How long you leave the tap running. Leave it running for ten seconds and you get more water than if you leave it for one second. In photography, this is the shutter speed - how long the camera lets light in.
There is a third factor: how big the glass is. A small glass fills up quickly. A big glass takes longer. In photography, this is ISO (or film speed) - how sensitive your camera is to light. A high ISO is a small glass. A low ISO is a big glass.
That is the entire foundation of exposure. Aperture, shutter speed, and ISO. Three controls. One goal: the right amount of light.
Every camera ever made - from an 1840s daguerreotype to the phone in your pocket - works on this same principle. The technology changes. The physics does not.
The Three Controls
Aperture - How Wide the Lens Opens
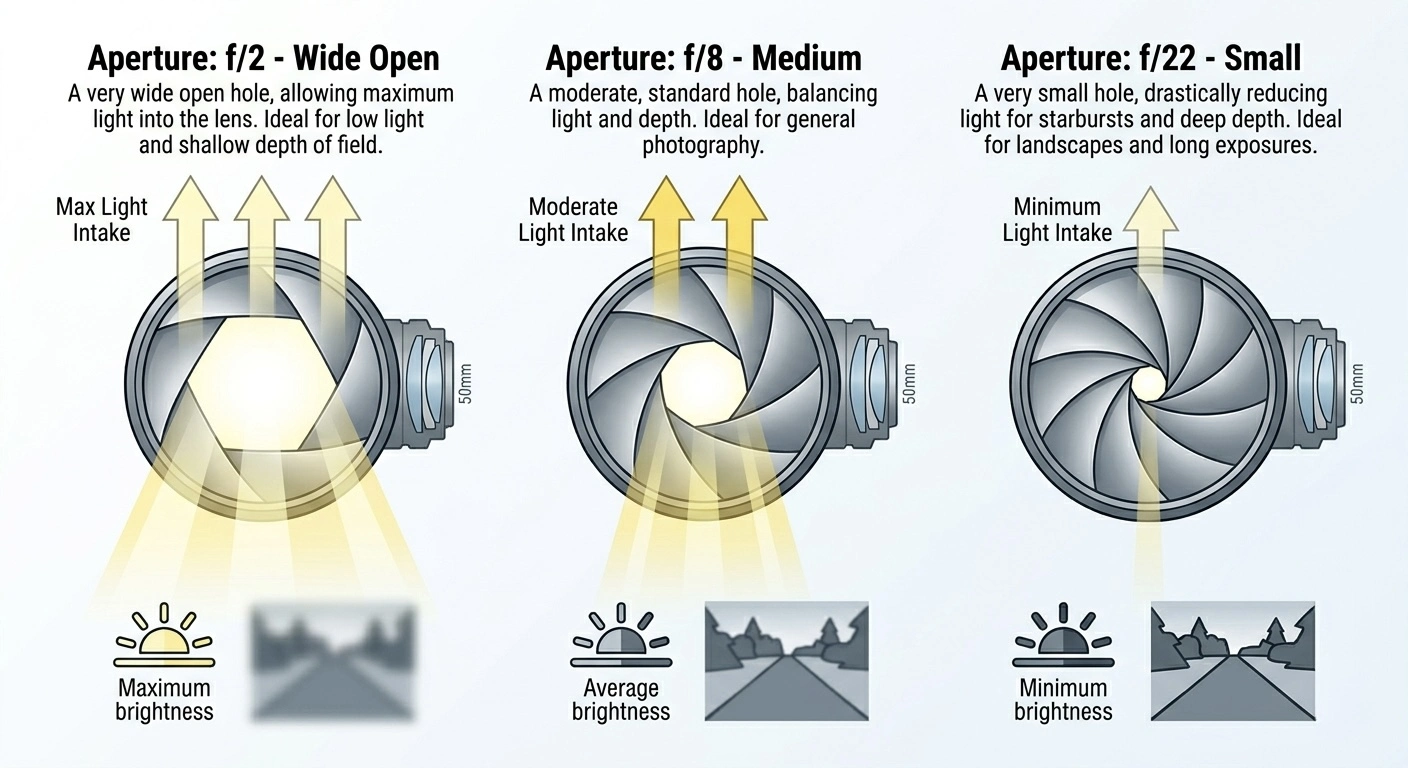
The aperture is a hole inside the lens that can be made bigger or smaller. It is measured in f-numbers (also called f-stops). Here is the confusing part: a smaller number means a bigger hole.
- f/2 - very wide open, lots of light comes in
- f/8 - medium, a moderate amount of light
- f/22 - very small hole, very little light
Why are the numbers backwards? It is a fraction. f/2 means the hole is half the focal length of the lens. f/22 means it is one twenty-second. Half is bigger than one twenty-second. That is all.
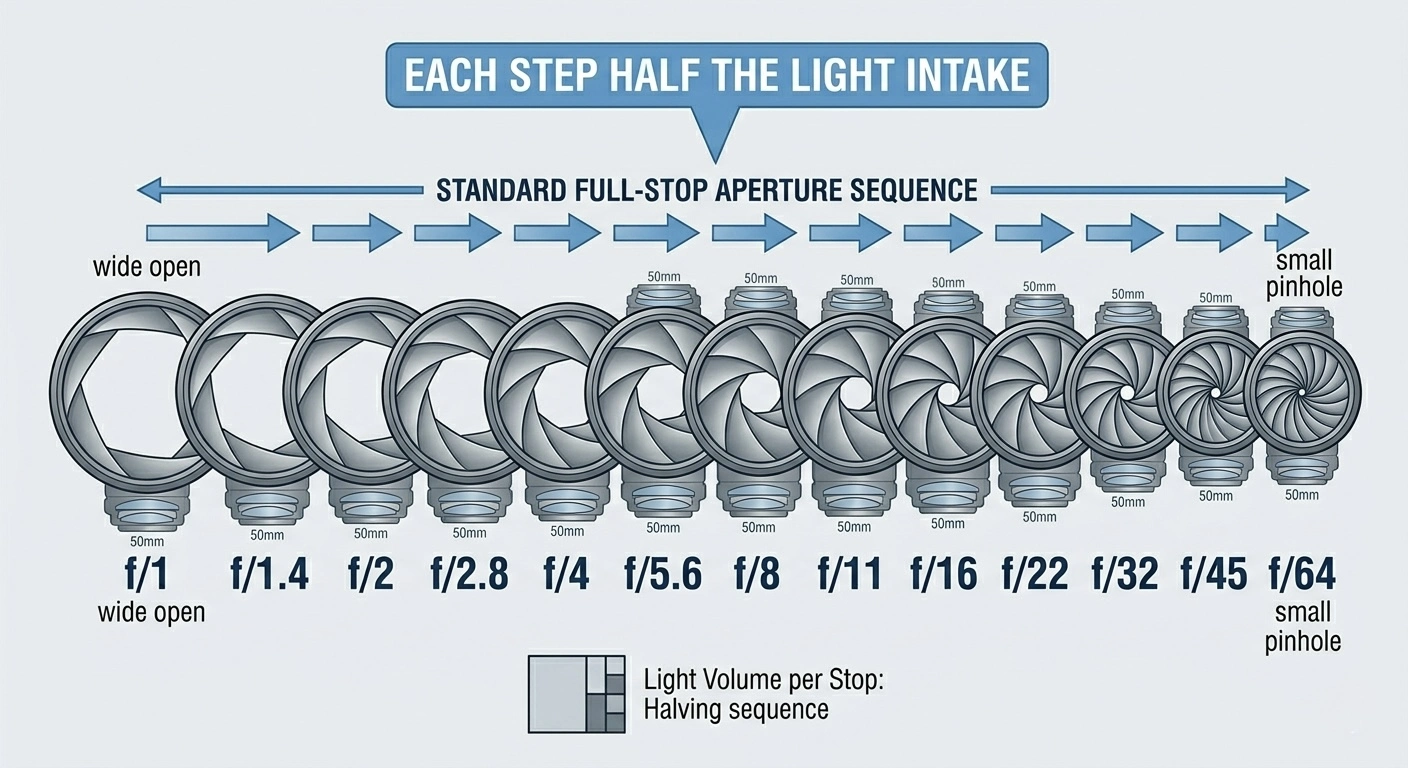
The standard full-stop aperture sequence is: f/1 → f/1.4 → f/2 → f/2.8 → f/4 → f/5.6 → f/8 → f/11 → f/16 → f/22 → f/32 → f/45 → f/64. Each step lets in exactly half the light of the step before it.
Aperture also controls depth of field - how much of the scene is in sharp focus. A wide aperture (f/2) gives a shallow depth of field: only the subject is sharp, the background is blurred. A small aperture (f/16) gives a deep depth of field: almost everything is sharp from near to far. This is why landscape photographers often shoot at f/11 or f/16, and portrait photographers often shoot at f/2 or f/2.8.
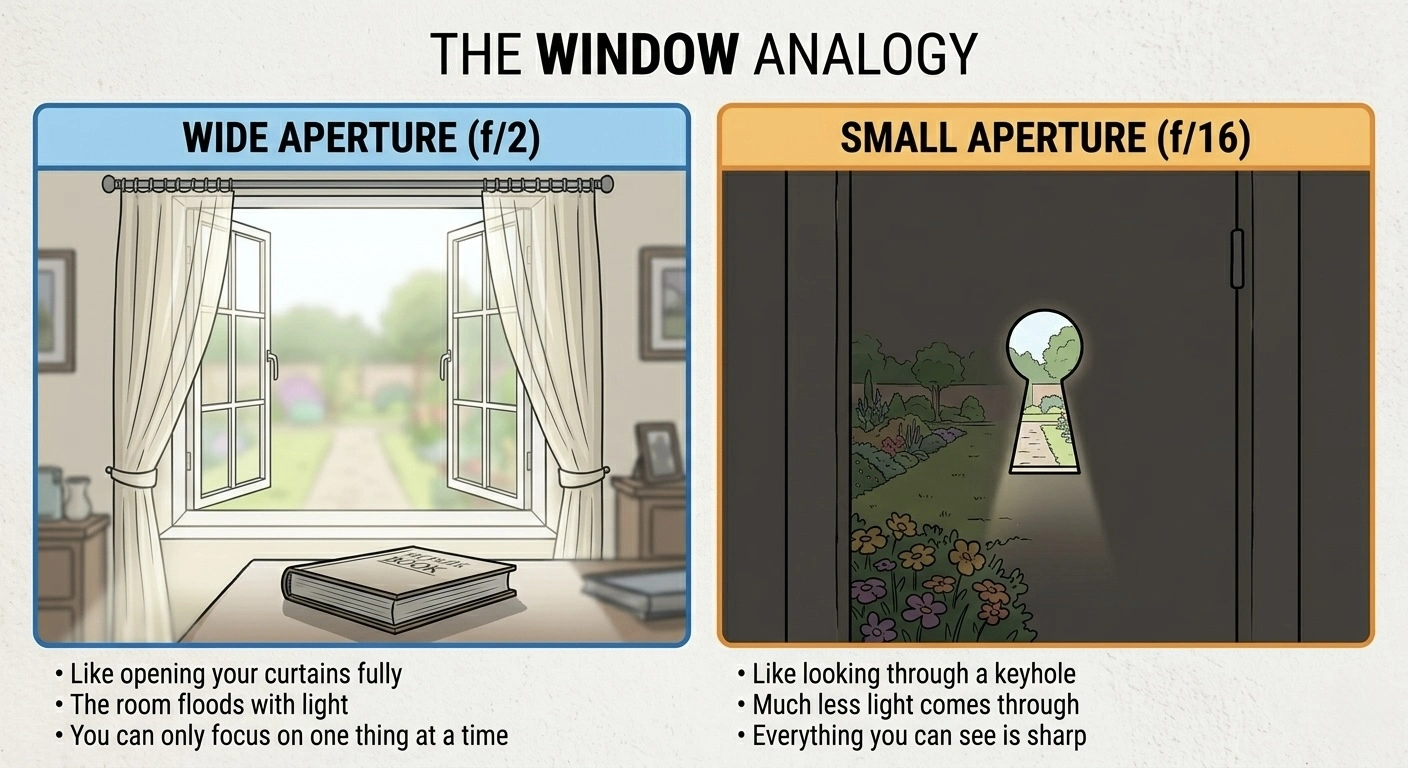
- Like opening your curtains fully
- The room floods with light
- You can only focus on one thing at a time
- Like looking through a keyhole
- Much less light comes through
- But everything you can see is sharp
Shutter Speed - How Long the Light Comes In
The shutter is a curtain (or electronic gate) that opens and closes. The speed is measured in fractions of a second for fast speeds, and whole seconds for slow speeds.
- 1/1000 - one thousandth of a second, very fast, freezes action
- 1/60 - one sixtieth of a second, a comfortable hand-held speed
- 1s - one full second, needs a tripod or everything will blur
- 30s - thirty seconds, for night photography or very dark scenes
The standard full-stop shutter speed sequence is: 1/8000 → 1/4000 → 1/2000 → 1/1000 → 1/500 → 1/250 → 1/125 → 1/60 → 1/30 → 1/15 → 1/8 → 1/4 → 1/2 → 1s → 2s → 4s. Each step doubles the time, which doubles the light.
As a rule of thumb, most people can hold a camera steady at about 1/60 of a second. Slower than that and you will probably need a tripod, a wall, or very steady hands.
ISO - How Sensitive the Camera Is
ISO is the sensitivity of your film or digital sensor to light.
- ISO 100 - low sensitivity, needs lots of light, but gives the cleanest image
- ISO 800 - moderate sensitivity, good for overcast days or indoors
- ISO 6400 - very sensitive, works in dim light, but the image will be grainy (film) or noisy (digital)
The standard ISO sequence is: 100 → 200 → 400 → 800 → 1600 → 3200 → 6400. Each step doubles the sensitivity, which is the same as doubling the light.
With film, you choose your ISO when you load a roll and you are stuck with it until the roll is finished. With digital, you can change ISO for every single shot.
In the Zone System era, ISO was called ASA. If you see ASA 100 in old books, it means the same as ISO 100.
What Is a Stop?
A stop is a doubling or halving of light. That is all it means. It is the universal unit of measurement in photography, and once you understand it, everything else clicks into place.
One stop more light = twice as much light.
One stop less light = half as much light.
Here is the crucial insight: it does not matter which control you use. One stop is one stop, whether you get there by changing the aperture, the shutter speed, or the ISO. They are all interchangeable.
This means if you have a correct exposure at f/8, 1/125, ISO 400, you can get the exact same amount of light with any of these:
- f/5.6, 1/250, ISO 400 - opened the aperture one stop wider, so halved the shutter time to compensate
- f/8, 1/60, ISO 200 - halved the ISO (one stop less sensitive), so doubled the shutter time (one stop more light)
- f/11, 1/125, ISO 800 - closed the aperture one stop, so doubled the ISO to compensate
The total light reaching the sensor or film is identical in every case. What changes is the look of the image - the depth of field, the motion blur, and the grain. That is why photographers care so much about individual settings even when the overall exposure is the same.
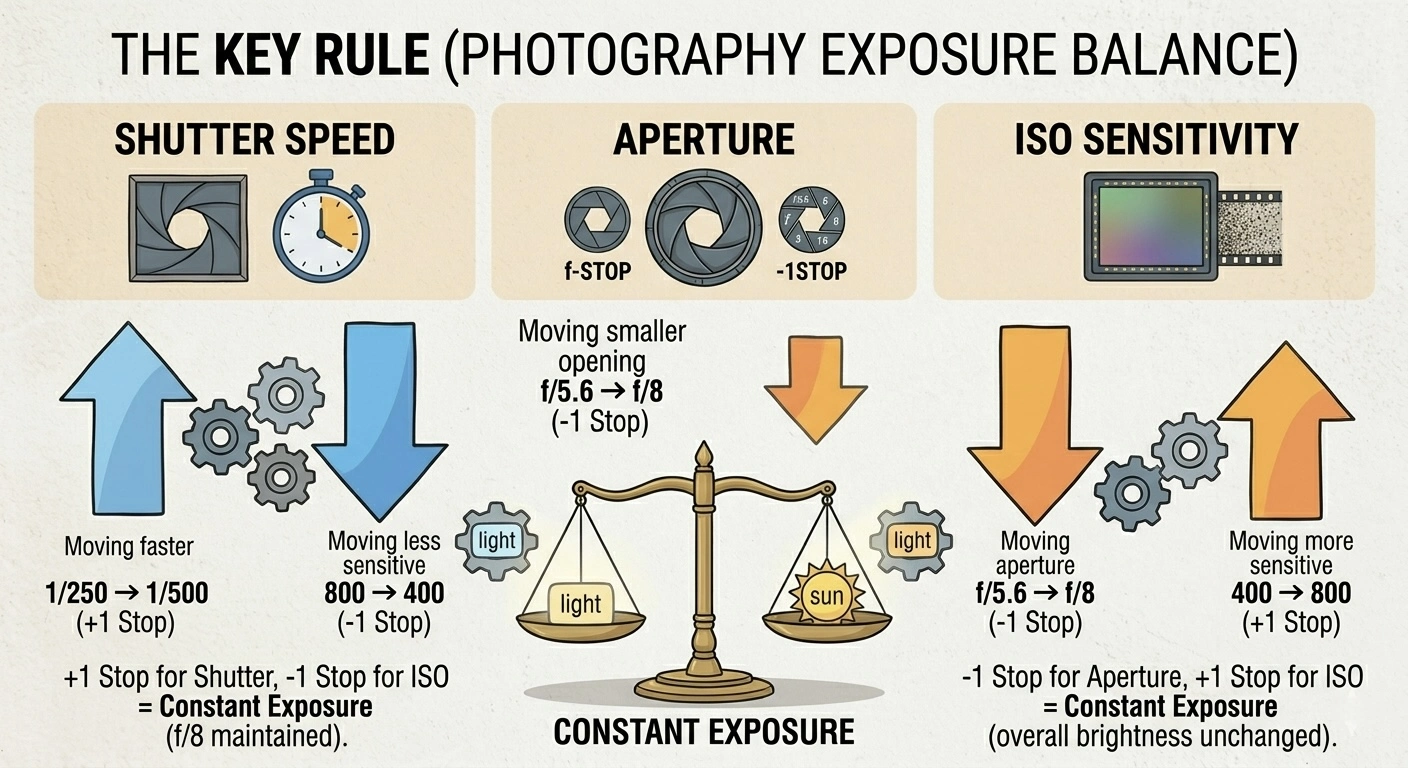
Every time you move one control by one stop in one direction, you must move another control by one stop in the opposite direction to keep the same exposure.
This reciprocal relationship is the foundation of the Zone System. The entire system is built on counting stops.
How a Meter Works
A light meter does one thing: it looks at the light in a scene and tells you what camera settings will produce a correctly exposed photograph. But to understand the Zone System, you need to know exactly how it decides what “correct” means.
There are two types of meter:
Reflected Light Meters
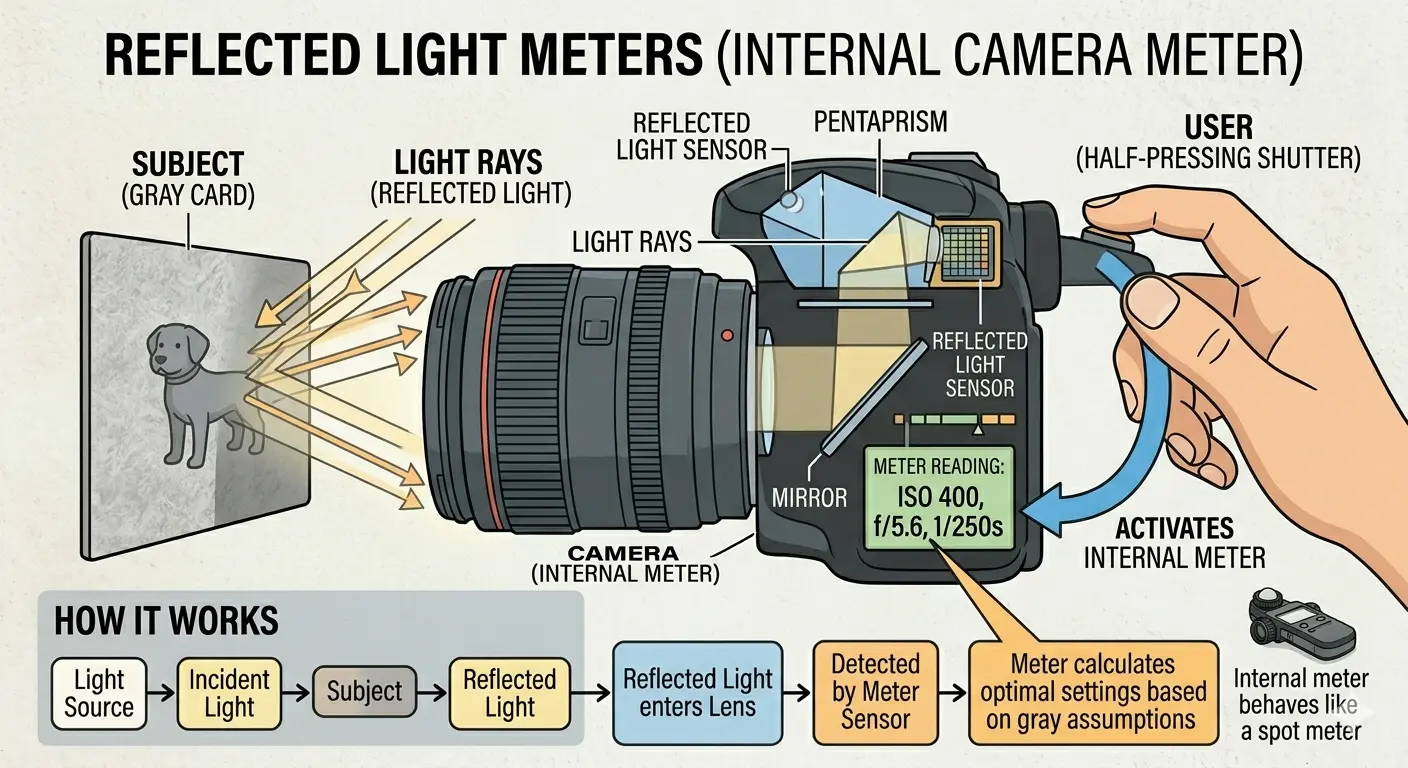
This is the meter inside your camera. It measures the light bouncing off the subject and coming towards you. When you point your camera at a scene and half-press the shutter button, this is the meter that gives you a reading.
Here is the single most important thing to understand about a reflected light meter:
A reflected light meter always assumes that whatever you are pointing it at is medium grey - specifically, a tone that reflects 18% of the light hitting it. It then recommends settings that will render that subject as medium grey in your photograph.
This is not a flaw. It is by design. The meter has no idea whether you are pointing it at a white wall, a dark coat, or a grey cat. It sees a certain amount of light, assumes it is looking at something middle-toned, and calculates accordingly.
If you point your camera at a white sheet of paper and take a photo using the meter’s recommended settings, the paper will come out grey in the image. Not white. Grey. The meter saw a lot of light, assumed it was middle grey, and told the camera to darken the exposure to make it so.
If you point your camera at a black jacket and take a photo using the meter’s recommended settings, the jacket will also come out grey. The meter saw very little light, assumed it was middle grey, and told the camera to brighten the exposure to make it so.
This is why you sometimes take a photo and it looks too dark or too bright. The meter was fooled by a scene that was not actually middle grey.
Incident Light Meters
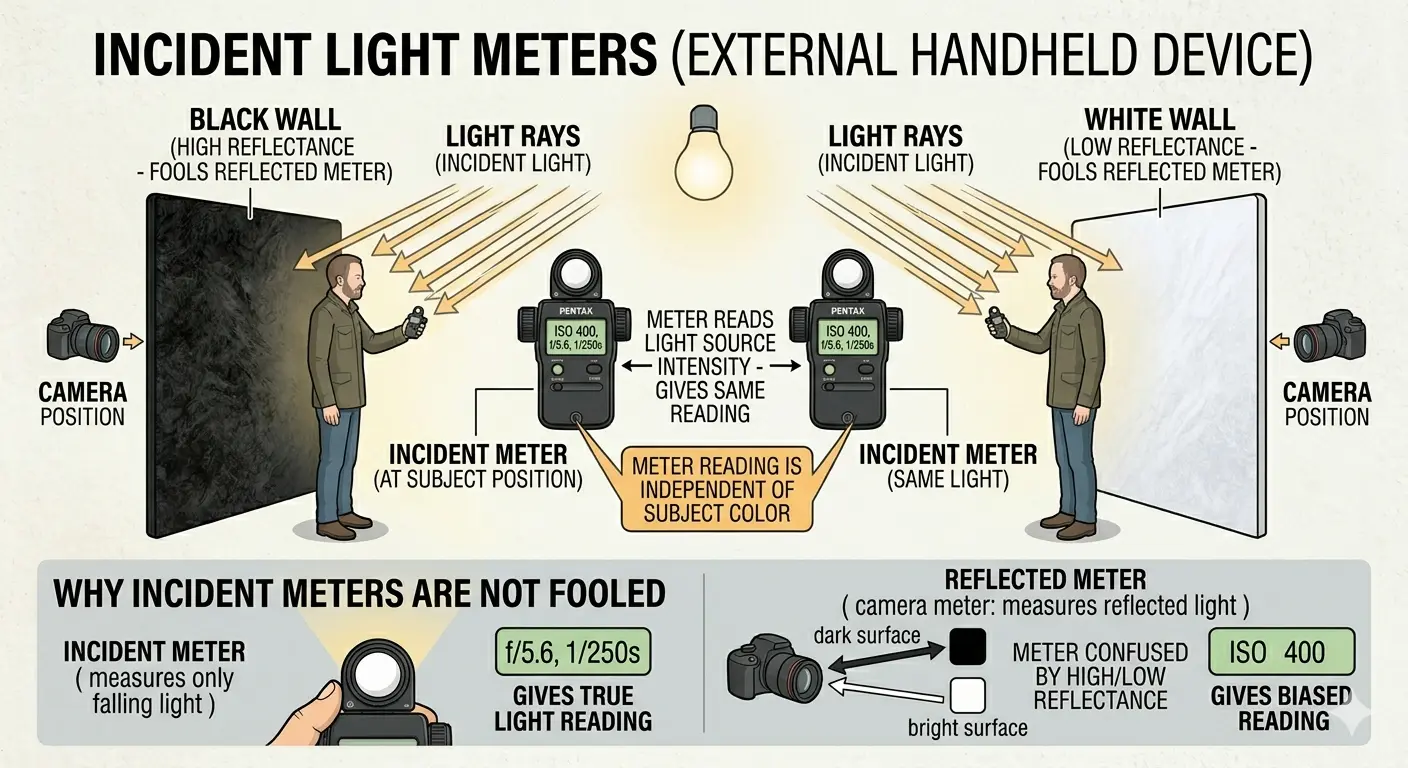
An incident meter is a separate handheld device. Instead of measuring light bouncing off the subject, it measures the light falling onto the subject. You hold it at the subject’s position and point it back towards the camera.
Because it measures the light source rather than the subject’s reflectance, it is not fooled by dark or light subjects. A white wall and a black wall in the same light will give the same incident reading, because the same light is falling on both of them.
Incident meters are excellent for consistent exposure. But they cannot tell you anything about the brightness range of a scene - the difference between the darkest and brightest areas. For that, you need a reflected meter, and specifically a spot meter.
Spot Meters
A spot meter is a reflected meter that measures a very small area of the scene - typically 1 to 5 degrees. Instead of averaging the whole frame, it reads a tiny circle in the centre of your viewfinder.
This is the meter that makes the Zone System possible. By pointing a spot meter at different parts of a scene - the shadow under a tree, the sunlit wall, the sky - you can measure each area independently and know exactly how many stops apart they are. That range is the information the Zone System is built on.
Many cameras have a spot metering mode built in. On most cameras, look for a dot icon in the metering mode menu. Some dedicated handheld spot meters, like the Sekonic L-858D or the Pentax Digital Spotmeter, are still used by Zone System practitioners today.
Why Meters Get It Wrong
Now you know that a reflected meter assumes everything is middle grey, you can predict exactly when it will be wrong - and by how much.
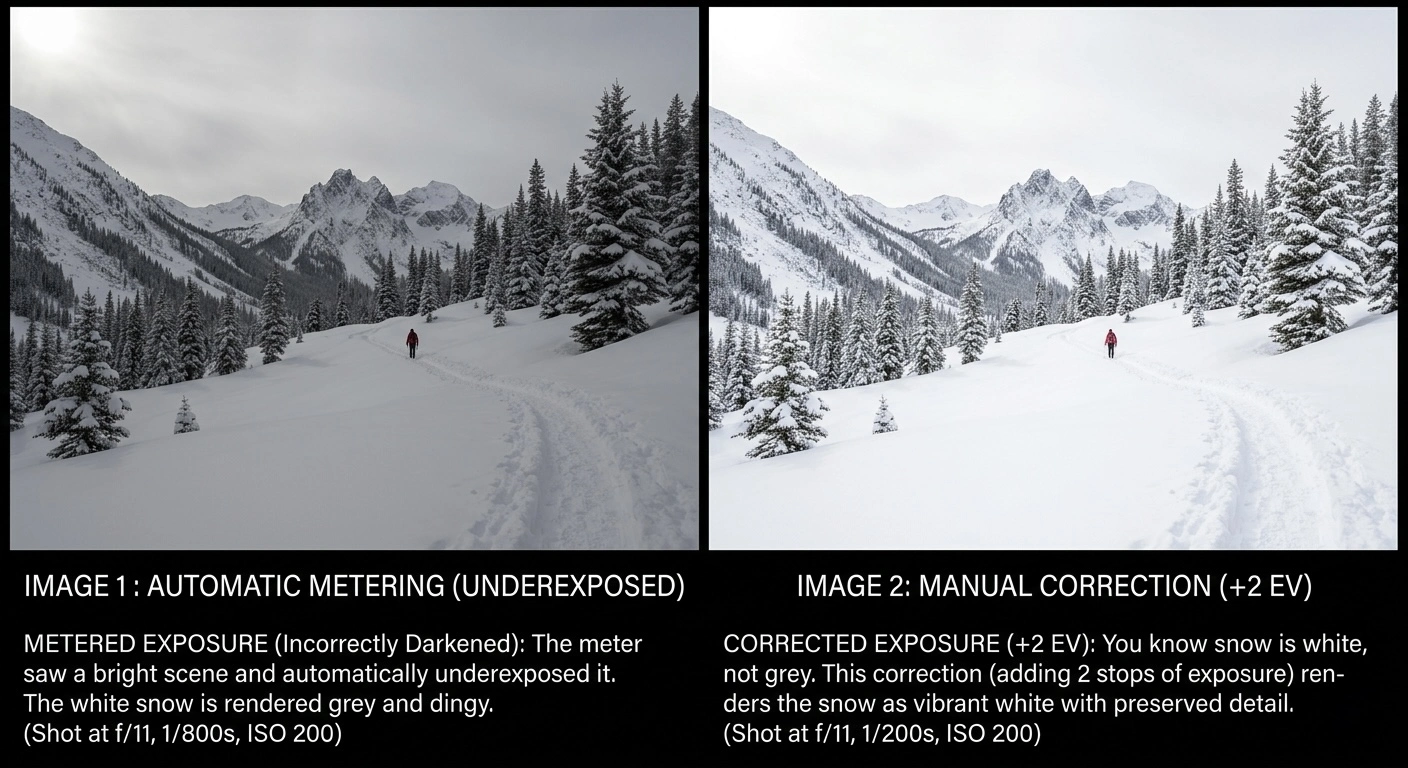
Snow
You are photographing a snowy landscape. The meter sees a huge amount of light bouncing off all that white snow. It thinks: “That is a lot of light - this must be a very bright middle grey.” It recommends settings that will darken the image. Result: your snow comes out grey and dingy.
The fix: You know snow is white, not grey. White is about two stops brighter than grey. So you add two stops of exposure to what the meter says. Open up two stops on the aperture, or slow the shutter by two stops. Now the snow comes out white.
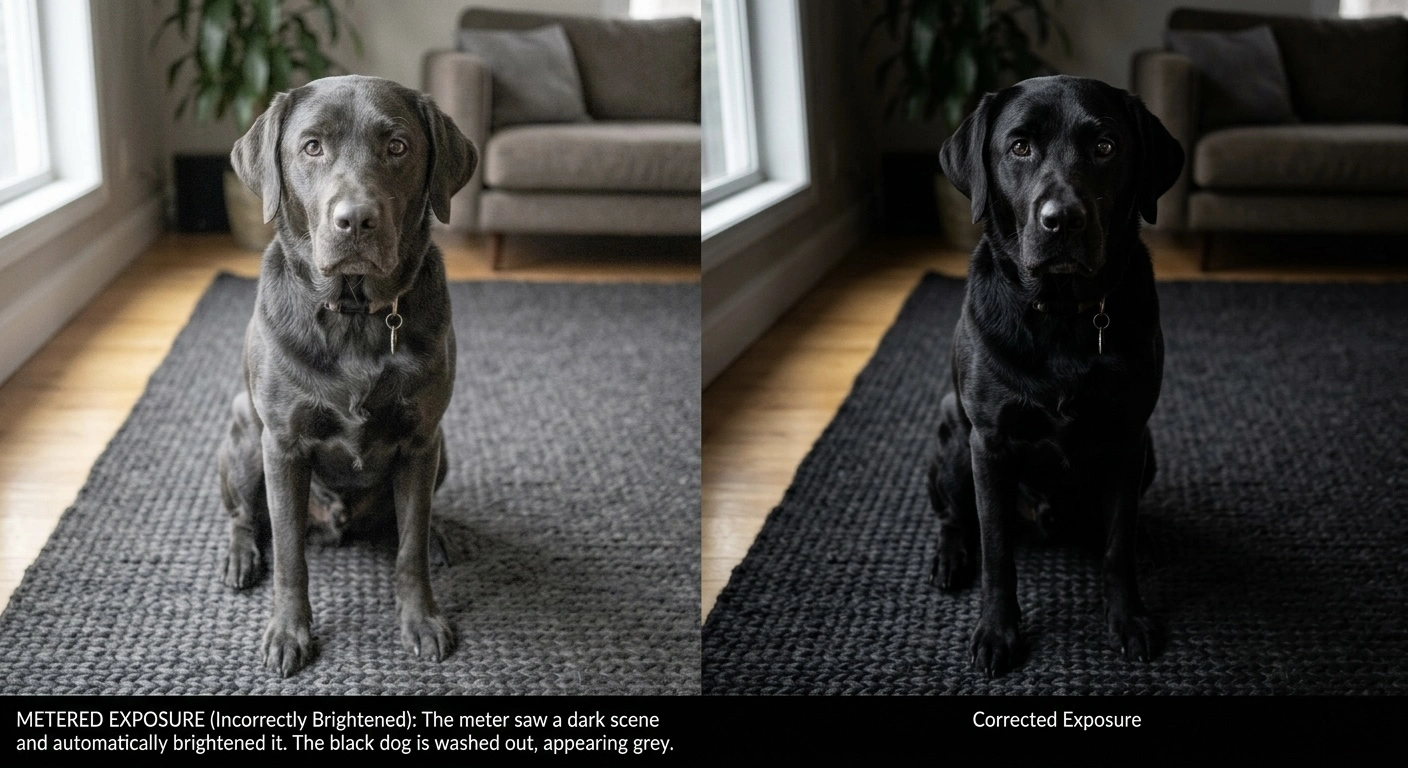
A Black Dog on a Dark Rug
The meter sees very little light. It thinks: “Not much light - this must be a very dark middle grey.” It recommends settings that will brighten the image. Result: the black dog comes out grey and washed-out.
The fix: You know the dog is black, not grey. Black is about two stops darker than grey. So you subtract two stops of exposure from what the meter says. Now the dog comes out properly black.
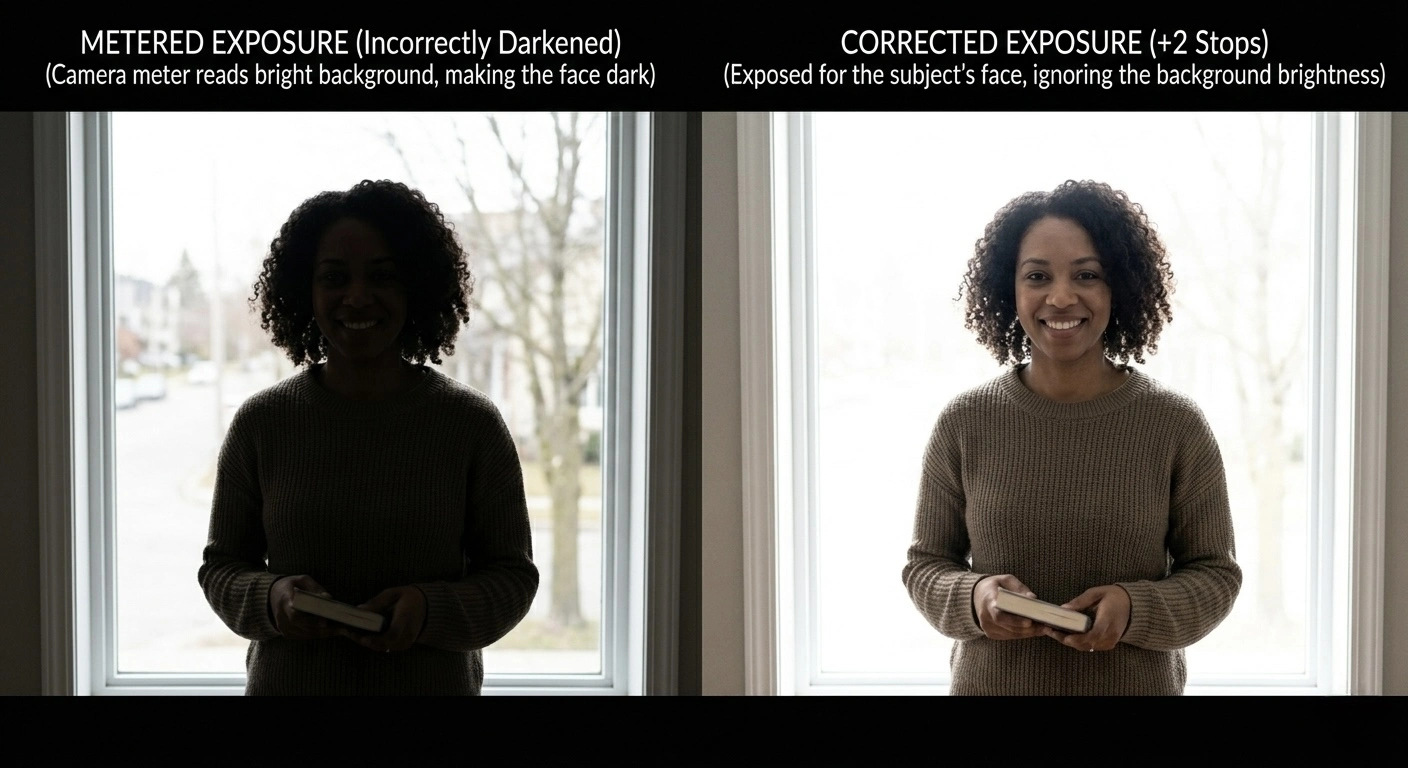
Backlit Portraits
Your subject is standing in front of a bright window. The meter sees the window and thinks the whole scene is very bright. It recommends settings for the window. Result: the window looks fine, but your subject’s face is a dark silhouette.
The fix: Use spot metering to read the subject’s face only, ignoring the window. Or use an incident meter at the subject’s position. Or add exposure compensation of +1 to +2 stops.
- Snow, white walls, bright sand
- Meter will underexpose (too dark)
- You need to add exposure (+1, +2)
- Black fabric, dark forest, coal
- Meter will overexpose (too bright)
- You need to subtract exposure (-1, -2)
This is exactly what the Zone System formalises. Instead of guessing “a bit brighter” or “a bit darker,” it gives you a precise eleven-step scale.
Film vs Digital
Film and digital sensors both capture light, but they respond to it differently - and the difference matters enormously for exposure decisions.
How Film Captures Light
Film is a strip of plastic coated with crystals of silver halide. When light hits these crystals, they change chemically. The more light, the more change. When the film is developed in chemicals, those changed crystals turn into metallic silver (in black-and-white) or trigger dye layers (in colour). The result is a negative - an image where light areas are dark and dark areas are light - which is then printed or scanned to create the final image.
Film has a characteristic that photographers call a shoulder: as you give it more and more light, it gradually stops responding. Think of a sponge absorbing water. At first it soaks up everything eagerly. As it gets saturated, it absorbs less and less. This means film is forgiving of overexposure. Give it too much light and the highlights compress gently rather than blowing out suddenly. Bright clouds keep some detail. A white shirt keeps some texture.
But film is unforgiving of underexposure. In the shadows, film needs a minimum amount of light before it responds at all. Below that threshold, you get nothing - just blank, empty, textureless black. You cannot recover detail that the film never captured.
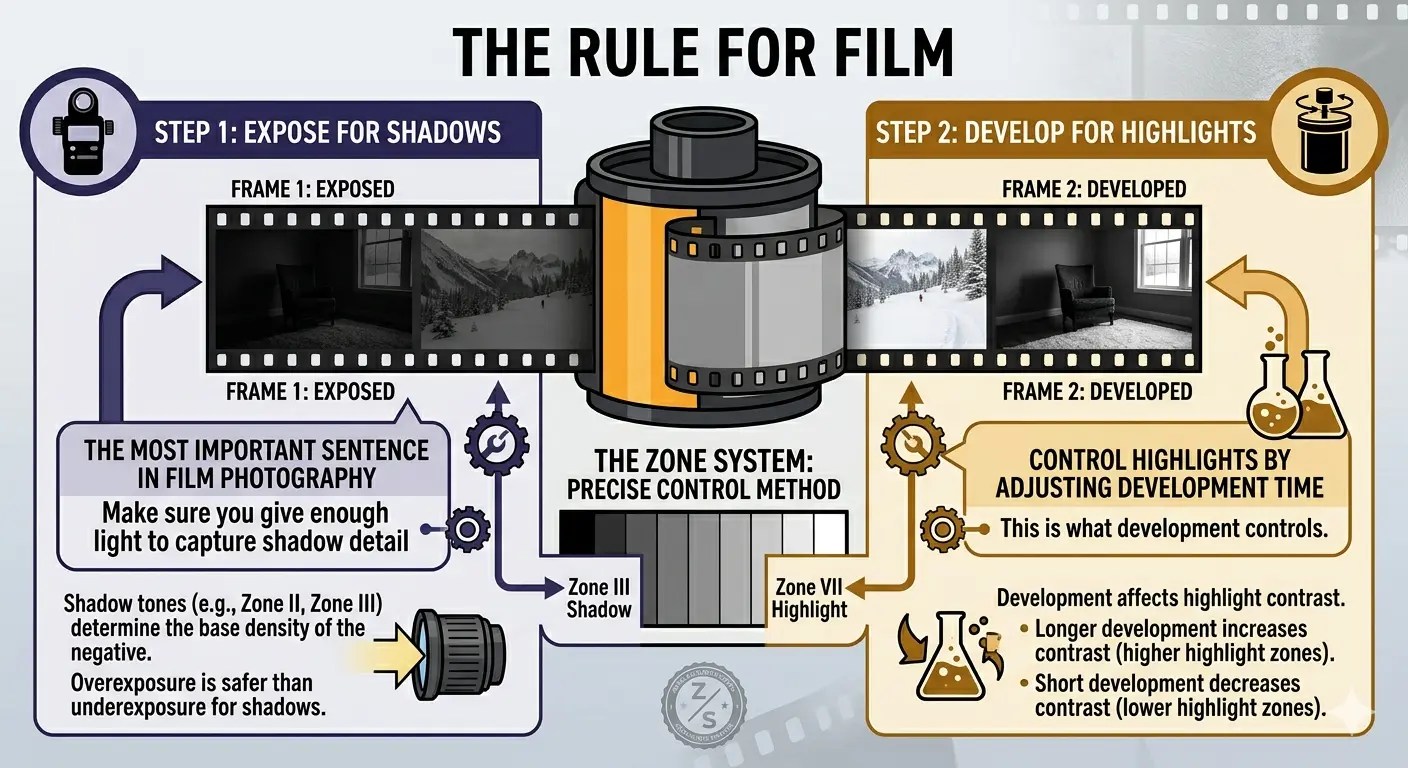
Expose for the shadows, develop for the highlights.
This is the most important sentence in film photography. It means: make sure you give enough light to capture shadow detail (that is what exposure controls), and then control the highlights by adjusting how long you develop the film (that is what development controls). The Zone System is the method for doing this precisely.
How Digital Sensors Capture Light
A digital sensor is a grid of millions of tiny light-sensitive cells (photosites). Each cell counts photons - particles of light. More photons = a bigger number. When the cell reaches its maximum count, it is full. Any more photons are simply ignored.
This means digital is the opposite of film in its failure mode. When a digital sensor overexposes, it clips hard. The cell hits its maximum and everything above that is recorded as pure white with zero detail. A bright cloud does not compress gently into near-white - it snaps to flat, featureless white. This is called “clipping” or “blowing out.”
But digital is forgiving of underexposure. Shadows contain noise, but modern sensors can recover a remarkable amount of detail from dark areas. You can brighten a shadowy area by two or three stops in post-processing and still get a usable image.
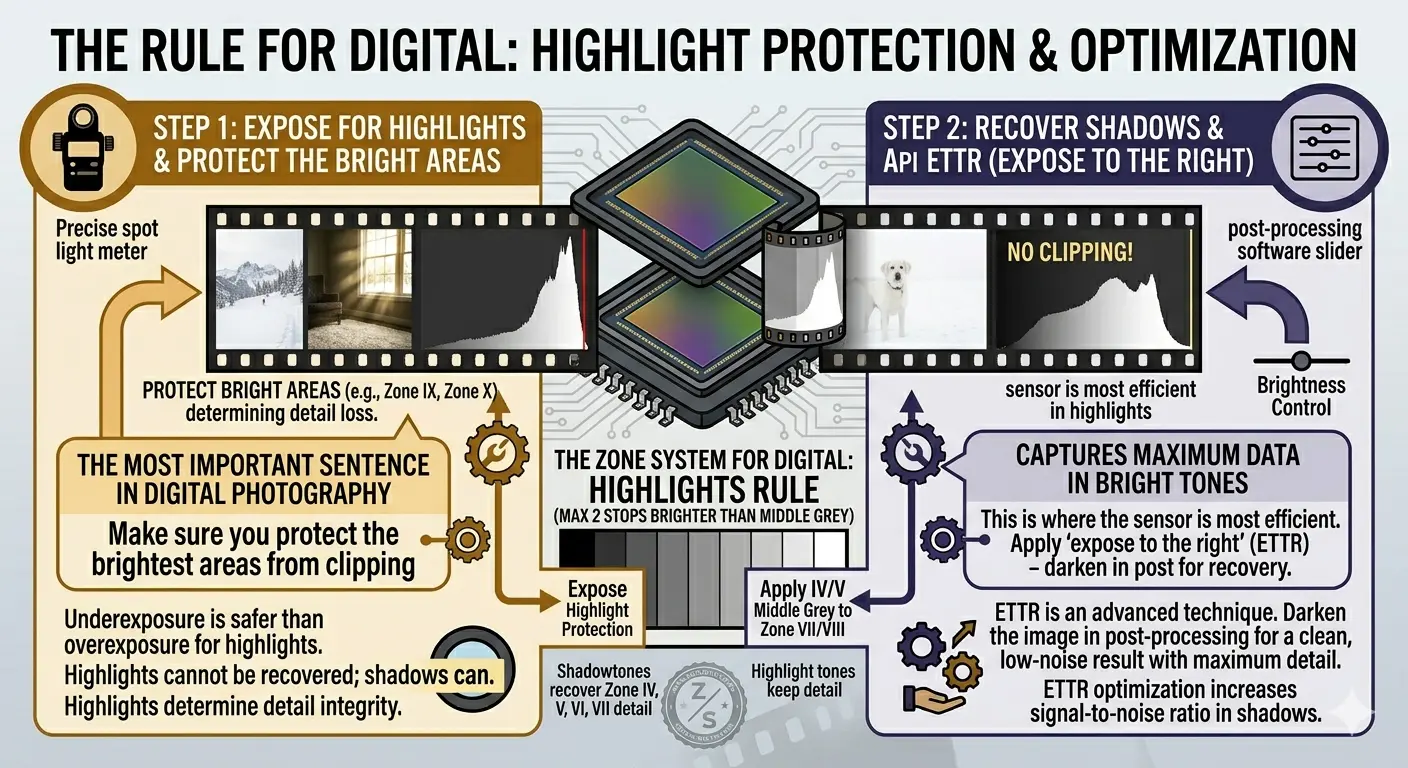
Expose for the highlights - protect the bright areas, recover the shadows later.
Some digital photographers take this further with a technique called “expose to the right” (ETTR) - deliberately making the image as bright as possible without clipping the highlights, then darkening it in post. This captures the maximum amount of data in the bright tones where the sensor is most efficient.
Dynamic Range
The range between the darkest shadow and the brightest highlight that your camera can capture in a single exposure is called dynamic range. It is measured in stops.
- Negative film (colour): about 12-14 stops
- Negative film (black-and-white): about 10-14 stops, depending on development
- Slide film (transparency): about 5-6 stops - very unforgiving
- Modern digital: about 12-15 stops at base ISO
For context, a sunny outdoor scene with deep shadows can have a brightness range of 15 stops or more. No single exposure can capture all of it. This is why photographers must make choices about which tones to keep and which to sacrifice - and the Zone System is the framework for making those choices deliberately rather than by accident.
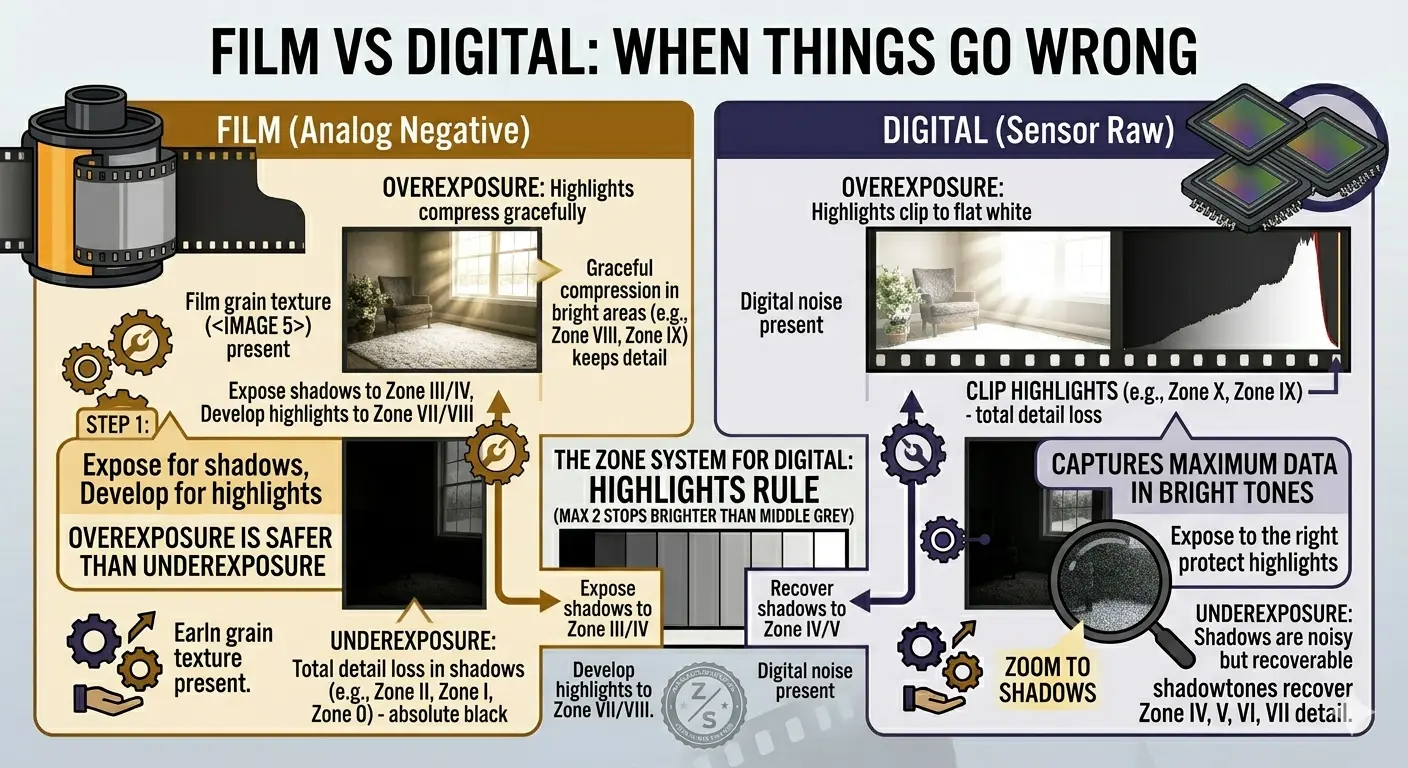
- Overexposure: highlights compress gracefully
- Underexposure: shadows disappear completely
- Strategy: err on the side of overexposure
- Overexposure: highlights clip to flat white
- Underexposure: shadows are noisy but recoverable
- Strategy: err on the side of underexposure
What Is the Zone System?
The Zone System is a method for controlling exactly how bright or dark every part of your photograph will be. It was developed in the late 1930s by Ansel Adams and Fred Archer, and it remains the most precise framework for exposure ever created.
Before the Zone System, photographers guessed. They had light meters, but as we have seen, meters can be fooled. A photographer might meter a scene, take the shot, develop the film, and only then discover that the shadows were empty or the highlights had burned out. By that point it was too late. The moment was gone.
Adams wanted to be able to stand in front of a scene, take a few meter readings, and know - before pressing the shutter - exactly what the final print would look like. Not approximately. Exactly. He wanted to previsualize the result.
The Zone System gave him that ability. Here is how it works, in the simplest possible terms:
- Divide all possible tones into eleven zones, from pure black (Zone 0) to pure white (Zone X). Each zone is exactly one stop apart.
- Use a spot meter to measure different parts of the scene. The meter tells you the brightness of each area relative to the others.
- Decide where to “place” one of those readings on the zone scale. This is your creative decision - do you want that shadow to be dark-with-detail (Zone III) or near-black (Zone I)?
- See where everything else “falls” on the scale. Once you place one tone, all the others land on their corresponding zones automatically, because the stop differences between them are fixed.
- Check the range. If the scene spans more zones than your film can capture, you have a problem to solve - either by adjusting development, adding light, or accepting the loss of detail at one end.
That is the whole system. Measure, place, check, expose. It sounds simple because it is. The power comes from the precision - you are never guessing.
The “Zone” in Zone System refers to zones of brightness on a print, not areas of the scene. Zone V is always the same shade of grey regardless of what subject it represents.
The Eleven Zones
Each zone is one stop apart. Zone V is middle grey - the tone a meter assumes everything is. Everything else is measured relative to it.
Think of the zones as a staircase with eleven steps. At the bottom is absolute black. At the top is absolute white. Each step up doubles the brightness.
The Shadow Zones (0 – III)
Zone 0 - Pure black. No detail, no texture, no information. The deepest shadow in a doorway at night. In a print, this is the maximum black the paper can produce.
Zone I - Near black. There is a very faint sense of tone - you can tell it is not quite maximum black - but there is no texture or detail. The space under a bridge on a dark night.
Zone II - Deep shadow with the first hint of texture. You can sense that there is something there - a surface, a shape - but you cannot make out details. Deep shadows under dense trees. This is the lowest zone where film records usable detail.
Zone III - Dark with full detail. You can see texture, fabric weave, bark grain, stonework. This is the classic shadow placement - the zone where most photographers place their darkest important shadow. A dark jacket in open shade. Wet bark. Dark stone.
The Middle Zones (IV – VI)
Zone IV - Dark middle tone. Shadow with good detail. Dark foliage in sunlight. A landscape shadow that you can easily read. Dark skin in open shade.
Zone V - Middle grey. This is the fulcrum of the system. An 18% grey card. Weathered wood. Average stone. Dark blue sky. This is what every meter in the world is calibrated to. When your meter gives you a reading, it is telling you the settings that will render that subject as Zone V.
Zone VI - Light middle tone. Average Caucasian skin. Light stone. Clear north sky. Concrete in sunlight. This is the classic skin placement for portraits of lighter-skinned subjects.
The Highlight Zones (VII – X)
Zone VII - Bright with full detail. Very light skin. Bright concrete. Snow in side lighting where you can see every crystal and ripple. This is the highest zone where most films hold full texture.
Zone VIII - Near white with slight texture. Snow in flat light where you can just make out surface variation. A white-painted wall in shade. Bright clouds with a hint of form. The upper limit of useful detail on most films.
Zone IX - Near white without texture. Bright glare on water. The edge of a light source. You can tell it is not pure white, but there is no texture or detail.
Zone X - Pure white. The paper itself, with no ink at all. Direct light sources. Specular reflections on metal or water. Maximum brightness.
The useful range. Most black-and-white negative film holds detail across about seven zones - from Zone II to Zone VIII. Everything outside that range is either featureless black or textureless white.
Zones are written in Roman numerals by convention. This is partly tradition and partly practical - it prevents confusion between Zone numbers and other numerical values like f-stops and shutter speeds in field notes.
Placing and Falling
These are the two most important words in the Zone System. “Placing” is the one decision you make. “Falling” is everything that follows from it.
What “Placing” Means
When you take a spot meter reading of one area of your scene, the meter tells you what settings will render that area as Zone V (middle grey). But you might not want it to be middle grey. A dark stone wall should look dark. A bright sky should look bright.
Placing means choosing which zone you want that metered area to appear on in the final image.
Let’s walk through a concrete example:
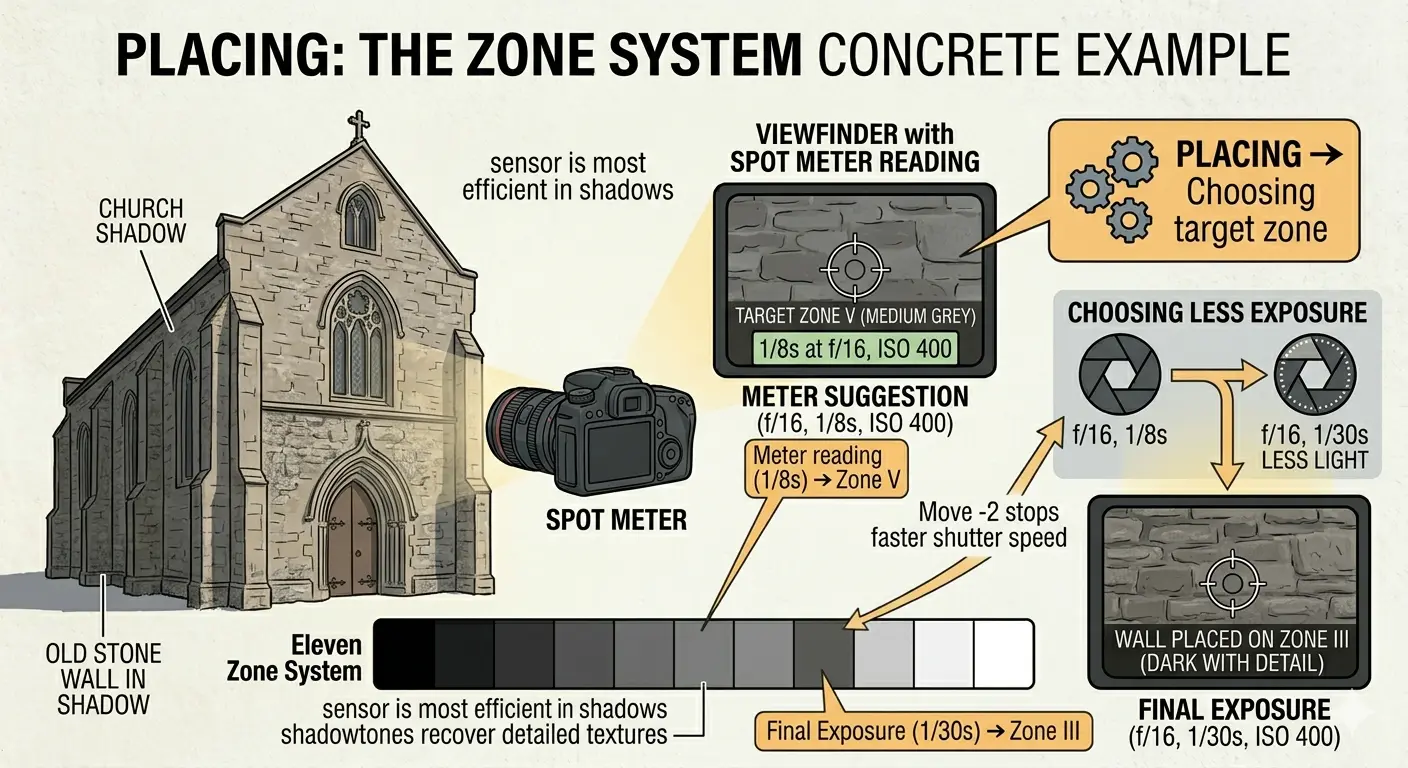
You are standing in front of an old church. You point your spot meter at the dark stone wall in shadow. The meter says: 1/8 at f/16. This means if you shoot at 1/8, f/16, the wall will come out as Zone V - medium grey.
But you look at the wall and think: “That wall is dark. It should be dark in the print. I want to see the texture of the stone, but it should be clearly in shadow.” You decide it belongs on Zone III.
Zone III is two stops below Zone V. So you need to give the wall two stops less exposure than the meter suggested. Instead of 1/8, you shoot at 1/30 (two stops faster). Now the wall will render as Zone III - dark with full detail. Exactly what you wanted.
You placed the wall on Zone III.
What “Falling” Means
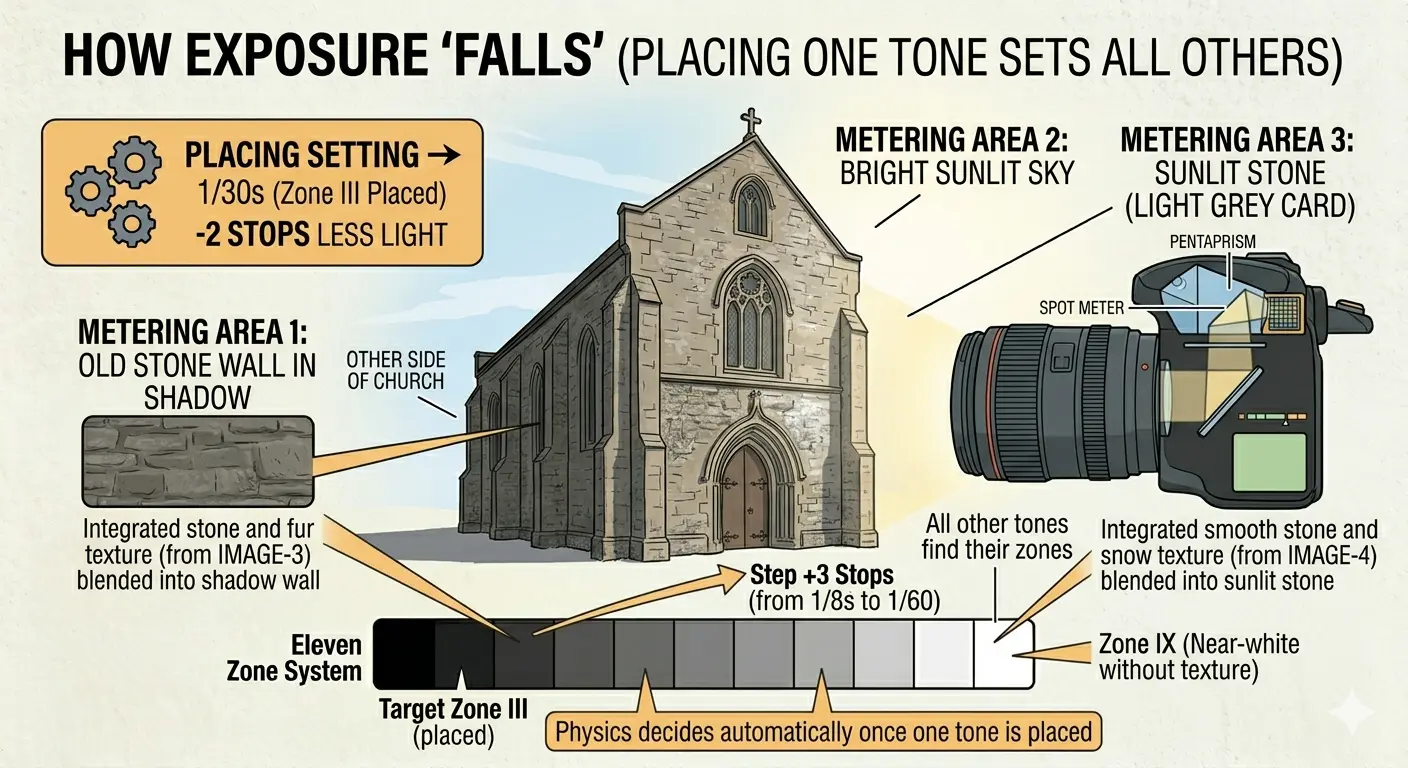
Here is the magic. Once you have set your exposure by placing one tone, every other tone in the scene falls on its corresponding zone automatically. You do not choose where they go - physics decides.
Continuing the church example: you placed the dark wall (meter reading 1/8) on Zone III by shooting at 1/30. Now, what happens to the bright sky? You metered the sky earlier and it read 1/500. That is six stops brighter than the wall’s reading of 1/8.
The wall is placed on Zone III. The sky is six stops brighter. So the sky falls on Zone III + 6 = Zone IX. That is near-white without texture - which is exactly what a bright sky looks like in a good print.
What about the sunlit stone on the other side of the church? You metered it at 1/60 - three stops brighter than the shadow wall. So it falls on Zone III + 3 = Zone VI. Light middle tone. That will show the stone with good detail in a lighter shade. Perfect.
You place one tone. Everything else falls. Placing is a creative decision. Falling is arithmetic.
This is why the Zone System is so powerful. You make one decision - where to place one metered tone - and instantly know where every other tone in the scene will land. If you do not like where something falls, you can re-place your chosen tone and check again.

A Simple Worked Example
Scene: a figure standing in a doorway. You take three spot meter readings at f/16, ISO 100:
- Dark interior behind the figure: 1/2 second
- The figure’s face (in shadow): 1/8
- Bright wall outside: 1/250
You decide the face is the most important element. You want it to show detail but look like it is in shade. You place the face on Zone IV (shadow detail).
The meter said 1/8 for the face (which would make it Zone V). Zone IV is one stop below V, so you shoot at 1/15 (one stop less exposure).
Now where does everything else fall?
- Dark interior: 1/2 is four stops slower than 1/8. The face is on Zone IV. The interior is four stops darker, so it falls on Zone IV - 4 = Zone 0. Pure black. The interior will be completely dark. That might be fine - it creates a dramatic silhouette effect.
- Bright wall: 1/250 is five stops faster than 1/8. The face is on Zone IV. The wall is five stops brighter, so it falls on Zone IV + 5 = Zone IX. Near white, no texture. The wall will be a bright wash of light.
The scene spans nine stops (Zone 0 to Zone IX). If you are shooting black-and-white negative film with seven stops of detail range (Zone II to VIII), you will lose the interior to pure black and the wall to near-white. The face and everything within about three stops either side of it will have full detail. Is that acceptable? Only you can decide. But now you know before you press the shutter.
Reading the Calculator
The Zone System Calculator on this site automates the arithmetic of placing and falling. Here is how to read it.
Step 1: Choose Your Mode
Select Shutter Speed or Aperture, depending on which value your meter gives you. If you are working at a fixed aperture (say f/16) and your meter gives you shutter speeds for different areas of the scene, choose Shutter Speed mode. If you are working at a fixed shutter speed and varying the aperture, choose Aperture mode.
Step 2: Place Your Reading
Select the zone where you want to place your metered area. If you metered a shadow and want it to be dark-with-detail, select Zone III. If you metered skin and want it to be a light middle tone, select Zone VI.
Then select the meter reading you got for that area. For example, if your meter said 1/8 for the shadow, select 1/8.
Step 3: Read the Strip
The calculator fills in the value for every zone. These values tell you: “If I point my spot meter at any area of the scene and it reads this value, that area will fall on this zone.”
This is the key to understanding the display. The values are what the meter would read for a subject that falls on that zone. They are not camera settings - they are reference points for interpreting your meter readings.
A Worked Example with the Calculator
You are at the church from the earlier example. Your settings are f/16, ISO 100. You choose Shutter Speed mode.
You metered the dark stone wall at 1/8 and want it on Zone III. You enter:
- Place on Zone: III
- Meter Reading: 1/8
The calculator shows:
- Zone 0: 1s
- Zone I: 1/2
- Zone II: 1/4
- Zone III: 1/8 (your placed reading - highlighted)
- Zone IV: 1/15
- Zone V: 1/30
- Zone VI: 1/60
- Zone VII: 1/125
- Zone VIII: 1/250
- Zone IX: 1/500
- Zone X: 1/1000
Now you meter the sky. Your meter reads 1/500. You look at the strip and find 1/500 - it sits on Zone IX. That is near-white without texture. Is that how you want the sky to look? If yes, your placement is correct. If you wanted more sky detail, you would need to re-place your shadow on a lower zone (which would bring the sky down too).
You meter the sunlit wall. Your meter reads 1/60. The strip shows 1/60 on Zone VI. Light middle tone. Good detail. That works.
Set the camera to the value shown on the zone where you placed your reading. That zone is highlighted in the calculator. In this example, you placed 1/8 on Zone III - but Zone V shows 1/30. So you set the camera to 1/30 at f/16. This gives the wall two stops less light than “correct” exposure, placing it on Zone III.
Why Zone V? Because cameras are calibrated to expose for Zone V. When you set the camera to 1/30, anything that meters at 1/30 will render as Zone V. Anything darker or brighter falls on its corresponding zone relative to V.
Try the calculator now: Open the Zone System Calculator
Zone System for Digital
The Zone System was invented for black-and-white film. But the underlying logic - measure, place, check the range - works with any camera, including the phone in your pocket.
What Changes
With film, you control two things: exposure (in camera) and development (in the darkroom). The Zone System connects them. You can “expand” or “compress” the tonal range by adjusting development time: develop longer (N+1, N+2) to increase contrast, develop shorter (N-1, N-2) to decrease it. This is the “develop for the highlights” half of the system.
With digital, you cannot control development. The sensor captures what it captures. But you have something film photographers never had: a histogram, a live preview, and nearly unlimited post-processing control.
What Stays the Same
The metering logic is identical. A digital spot meter reads reflectance the same way a film-era meter does. Zones are still one stop apart. Placing and falling work exactly the same.
The zone map still tells you the tonal range of a scene and whether it exceeds your sensor’s dynamic range. And the fundamental questions are the same: Where do I want my shadows? Where will my highlights land? Do I need to sacrifice detail somewhere?
Digital Zone System Workflow
- Set your camera to spot metering mode and switch to manual exposure (or use exposure lock).
- Meter the key areas of your scene just as you would with film. Note the difference in stops between the darkest important shadow and the brightest important highlight.
- Check the histogram. The histogram is a digital Zone System display. The left edge is Zone 0, the right edge is Zone X, and the peaks show where most of the tones in your scene concentrate. If the graph is crashing into the right edge, your highlights are clipping.
- Place your exposure. With digital, you typically place to protect highlights (expose for the right side of the histogram without clipping), then lift the shadows in post-processing.
- Shoot RAW. RAW files preserve the full data captured by the sensor. JPEG files discard information, especially in the shadows and highlights. If you want to use zone-based thinking with a digital camera, RAW is essential.
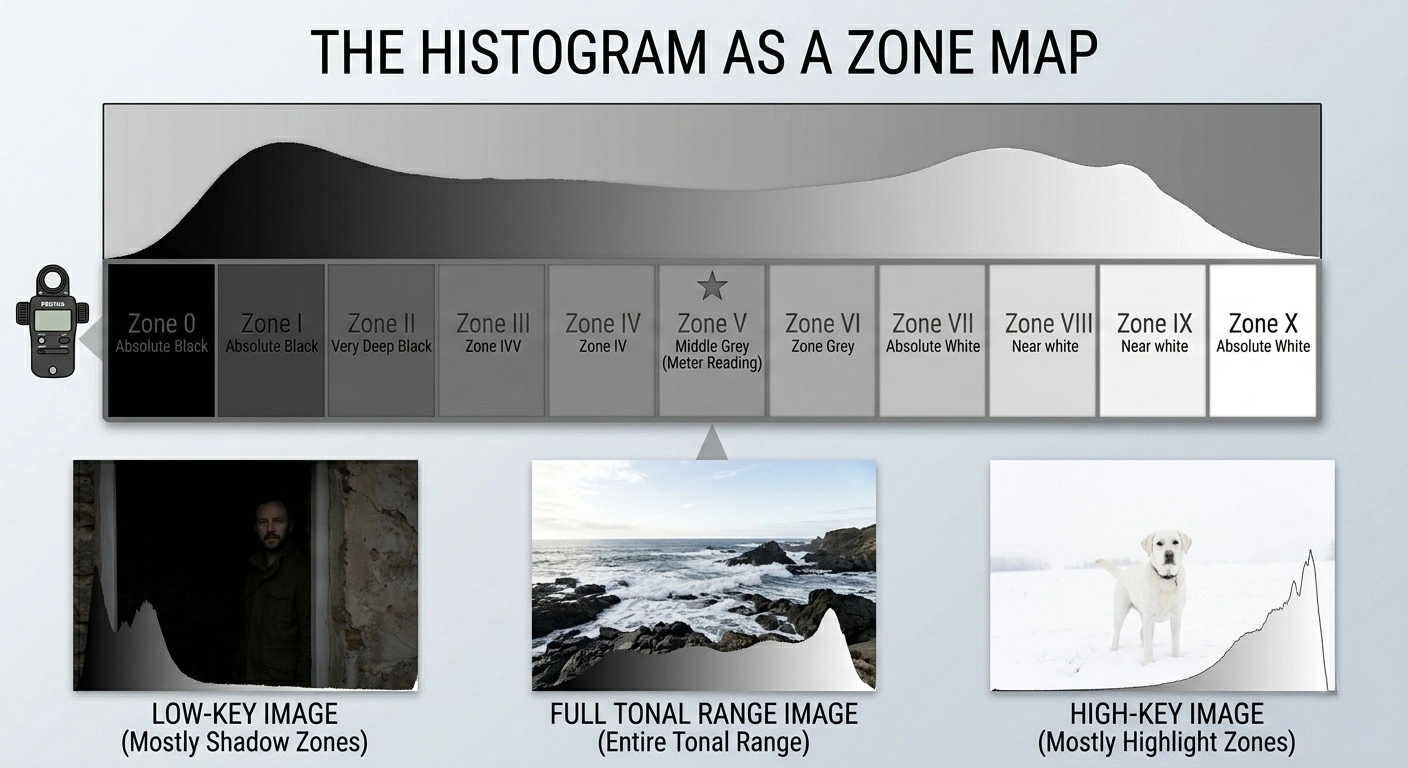
The Histogram as a Zone Map
Imagine stretching the eleven-zone strip across the width of your histogram. The left edge is Zone 0, the right edge is Zone X, and Zone V is the middle. Each zone occupies roughly one-eleventh of the histogram’s width.
When you look at a histogram, you are looking at a zone map of your image. A histogram bunched to the left is a low-key image with most tones in the shadow zones. A histogram bunched to the right is a high-key image in the highlight zones. A histogram that spans the full width is a high-contrast scene using the entire tonal range.
If the histogram is clipped on the right (a spike at the far right edge), you have tones that have hit Zone X - pure white with no detail. Unlike film, you cannot recover these. Reduce exposure.
If the histogram is clipped on the left (a spike at the far left edge), you have tones at Zone 0 - pure black. With digital, you may be able to recover some of this in post, depending on how severe the clipping is.
Some cameras offer a “highlight warning” or “blinkies” mode that flashes the clipped areas in the preview image. This is the digital equivalent of the Zone System’s range check - use it.
Field Workflow
Here is a practical step-by-step workflow for using the Zone System in the field, whether you are shooting film or digital. This is the process, stripped to its essentials.
For Film
- Set your ISO to match your film speed.
- Choose your aperture based on the depth of field you want. Typically f/11 or f/16 for landscapes, f/5.6 or f/8 for environmental portraits.
- Spot-meter three to five areas of the scene: the darkest shadow where you want detail, the brightest highlight where you want detail, and two or three mid-tones. Note the shutter speed reading for each.
- Count the range in stops between your shadow reading and your highlight reading. This is your scene contrast.
- Place the shadow. Decide which zone the darkest important shadow should be (usually Zone III). Use the calculator to set this.
- Check where the highlights fall. If they fall on Zone VIII or below, you are within normal film range. Develop normally (N).
- If highlights fall above Zone VIII, the scene is too contrasty for normal development. Consider N-1 development (pull one stop) for every zone the highlights overshoot. Mark the film holder with the development adjustment.
- If highlights fall below Zone VII, the scene is flat. Consider N+1 development (push one stop) to expand contrast.
- Set the camera to the shutter speed shown at Zone V in the calculator. This is your actual exposure setting.
- Expose.
For Digital
- Set your ISO to the lowest native value (usually 100 or 200) for best quality.
- Choose your aperture.
- Spot-meter the highlights - the brightest area where you want detail.
- Place the highlights on Zone VII or VIII. Set your exposure accordingly. This protects the highlights from clipping.
- Take a test shot and check the histogram. Make sure nothing clips on the right.
- Check where the shadows fall. If they are very dark (Zone I or II), you will need to lift them in post-processing. Modern sensors handle this well at base ISO.
- Shoot RAW.
- In post-processing, use the tone curve, shadows slider, and highlights slider to redistribute the zones to taste. This is the digital equivalent of darkroom burning and dodging.
Using the Photo Analyzer
The Zone System Calculator includes a scene analyzer. Photograph your scene with your phone or upload an image, and it will map the brightness zones across the frame. This gives you a quick visual preview of where the tones fall - which areas are in the shadow zones, which are in the highlights, and how wide the total range is.
Tap any cell on the overlay to select that zone, then enter your actual meter reading for that area. The calculator will fill in the rest.
The analyzer maps relative brightness from the image - it cannot know your actual camera settings. Always anchor the results to a real meter reading for accurate exposure calculations.
The Simplest Possible Summary

Point your meter at the most important dark area. Decide how dark it should look. Set your exposure to make it that dark. Check where the bright areas land. If they are too bright for your film or sensor, you have a problem to solve. If they are within range, press the shutter. You have just used the Zone System.